About me

Mein Bild
Duesseldorf, NRW, Germany
Iam a German 40s/50s/60s Pin up Girl, Retro Addict and Weirdo. I love make up, to craft, do photoshootings and collect vintage clothes/ lingerie. In my blog you can read all about it, mashed up with my thoughts about fashion/styling.

Topics

Shooting (158) 50s (80) photoshooting (79) fashion (71) make up (66) 40s (49) releases (48) 60s (36) review (36) making of (31) diy (18) lifestyle (10) how to (9) hair styling (7) modelling (7) styling (7) 30s (6) Skin care (1)
Posts mit dem Label hair werden angezeigt. Alle Posts anzeigen

Donnerstag, 24. November 2011

Beitrag bei "Guten Abend RTL" über die 50er Jahre/Rockabilly/Rock n Roll

Hallo ihr Lieben (und Bösen),

falls ihr den Bericht am 24. November 2011 bei "Guten Abend RTL" gesehen habt und euch etwas dort besonders interessiert hat, werdet ihr diese kleine Linkliste sicher hilfreich finden :-)

Schuhe, Strickjacke, Köfferchen: Ebay/Second Hand


Der Friseursalon von Andre in dem auch Mo arbeitet


Wenn ihr nicht um die Ecke von Cut Corner wohnt, könnt ihr euch auch in diesem Buch wertvolle Tipps holen


Die Band Hickory Cats!

Viel Spass beim besuchen aller dieser netten Leute!
Eure Sari!

P.s.: Ihr wollt das Andre, Mo und Anne-Marie eine eigene Fernsehshow bekommen in der sie Frauen zu Vintage Goettinnen umstylen? Ihr wollt das Christian und ich bei der nächsten Staffel von Let’s Dance mitmachen und in jedem RTL Trailer soll demnaechst ein Song der Hickory Cats spielen?  

Ok, vielleicht sollten wir das mit „Let’s Dance“ lieber lassen.... wie waers mit einem Star Schnitt von Christian und ich kriege eine Mini-Serie in der ich Internationale Retro HotSpots besuche und  bewerte (Second Hand Laeden natuerlich inklusive) ;-) vielleicht fandet ihr uns alle aber auch total doof und wollt das wir nie nie nie nie nie nie wieder auf eurem Radar auftauchen? Schreibt ne Email an GutenAbend@rtl.de  ;-)

Möge die Macht mit euch sein J

Dienstag, 1. November 2011

Playing with my hair.... 1 pin curl set - 4 looks

Hello everyone,

during fall break I managed to get my hair cut and last Saturday I started a new attempt to bleach a streak into my hair. It worked wayyyyyy better than last time! Today beeing a day off I got to play with it....

I used this basic pin curl pattern for every look: http://retromodelsari.blogspot.com/2011/07/tutorial-time-saving-and-curl_31.html

And here are the results...

No. 1: Front rolls with open hair in the back...


 No. 2: This is not sooooo much different from look 1. In this version I curled the hair in the back a bit under and pinned them together


 No.3: When Iam lazy I like to go with 60s look. Some teasing of the crown and Ian ready to go!


No.4: And often I´ll just make a 60s updo when the hair is loosing curl and I just wanna opt for something easy :-)

 How do you like my streak?

Sonntag, 31. Juli 2011

Tutorial: Time saving and curl protecting dry Pin Curl set

Hello everyone,

last time I showed you an tutorial with a hot roller set. Now you have spent all the time to make a pretty hot roller set and once you slept on it it is all destroyed? For that cases I use a dry pin curl set.

First off all: I don´t like the wet ones cause they take DAYS to dry. This is just not practicall for me. So I do a dry set - mostly after the hair has already been curled before to make it last for more days.

At the end of the day when you have enjoyed a pretty curly hair do it it quiet easy to do. Take yourself some pins like the ones I use in the picture - Bobby pins are just too slippery for me. I just use them to secure a slippery curl even more. As the hair is already curly or at least has some left over curl they technically fall into place. You take them. Roll them together to form a pincurl. Than pin.

If you are someone that likes to take showers in the evening do it just before you step into the shower. The steam with set the curls perfectly. If you don´t just moist your hands a LITTLE (!!!) and pat them on the pin curls. If you want you can also use a bit of setting lotion just in case. By the time you get up the next morning the curls are dry and you just need to take out the pins and brush through it.

Some explainations for the little set I did her the evening after the hot roller set. Click the pictures to enlarge cause the arrows turned out a little thin ;-)

I rolled them all flat towards my face (clock wise) exept for my bang which I made a standing pin curl.

Flat pin curls = curls
standing pin curls= volume

The direction you curl it is the direction it´ll fall to when you brush it out. Let´s say you want something that goes away from your face like a chignon you would want it to fall away from your face so you would curl it counter-clockwise.

Looks messy, but it works ;-)

The curls fall towards the face and I look dreadfully pale in those photos ;-)

After brushing it out the bang that was in a standing pin curl developed volume. All I did was to twist it a little and pin it into place. This is sort of an lazy day hair do. Off course I could have put it in a nice roll of put a flower in it, but we´re talking time saving and easy ;-)


Donnerstag, 21. Juli 2011

Pin up Girl Hot Roller Set

Hello everyone,

this is Day4 of my vacation and as I was bored today and coloured my hair yesterday I thought "Hey, let´s make a hot roller set and snap some photos!!!". So here is a little tutorial :-)

So... For the total noobs:

Big hair rollers=volume, so I mostly use the on top of my head.

Medium rollers: wave, so most of the time I use them at the sides.

Small rollers: curl. I mostly use them at the bottom as this is also the section where my hair starts hanging out the soonest.
For protecting your hair you spray on a setting spray designed to protect your hair from heat. Before rolling it. I took a rather light one today, but there are hardcore ones around ;-) If you have naturally poker straight hair it also doesnt hurt to give your hair some overall hairspraying once everything is rolled up.

Once you unroll, it all looks rather eeeeeeek! No worries. some good brushing does the trick.

Height and Volume on top, Wavy sides, curly ends and please ignore the left over colour on my skin ;-)I put in a light streak yesterday, but Iam not sure whether I like it. Possibly I will colour over it once I have made up my mind....

Samstag, 4. Dezember 2010

Vintage Hairstyling vs. Style me Vintage - Two hairstyling books in comparision

Hello Retro Styling enthusiasts,

when I heard that a new vintage hairstyling book was about to come out I was torn. For one thing I knew that it would be hard to live up to my personal styling bible "Vintage Hairstyling" that I bought in two editions and both where worth every penny. On the other hand, the newly published "Style me Vitage" was only 10 British pound, so I thought I give it a try. So this is a review for everyone that has one or the other and wonders which one to get - or is not having any of them and considers a buy (or and addition to the X-Mas wish list).


Let´s start with the pure facts:

on top: Vintage Hairstyling - Retro styles with step by step techniques by Lauren Rennels: 34 different Stylings, Price 36,95$

below: Style me Vintage - Easy step by step techniques for creating classic hairstyles by Belinda Hay : 11 different stylings, Price 9,95 British Pounds

First thing coming to mind is that "Style me Vintage" is more handy as it is smaller and book bound. More practical to take along and lay open while the binding of "Vintage Hairstyling" is less stabile. Plus "Style me Vintage" is cheaper in price, even if you have to import both of them like I have to. However "Vintage Hairstyling" has waaaay more stylings.


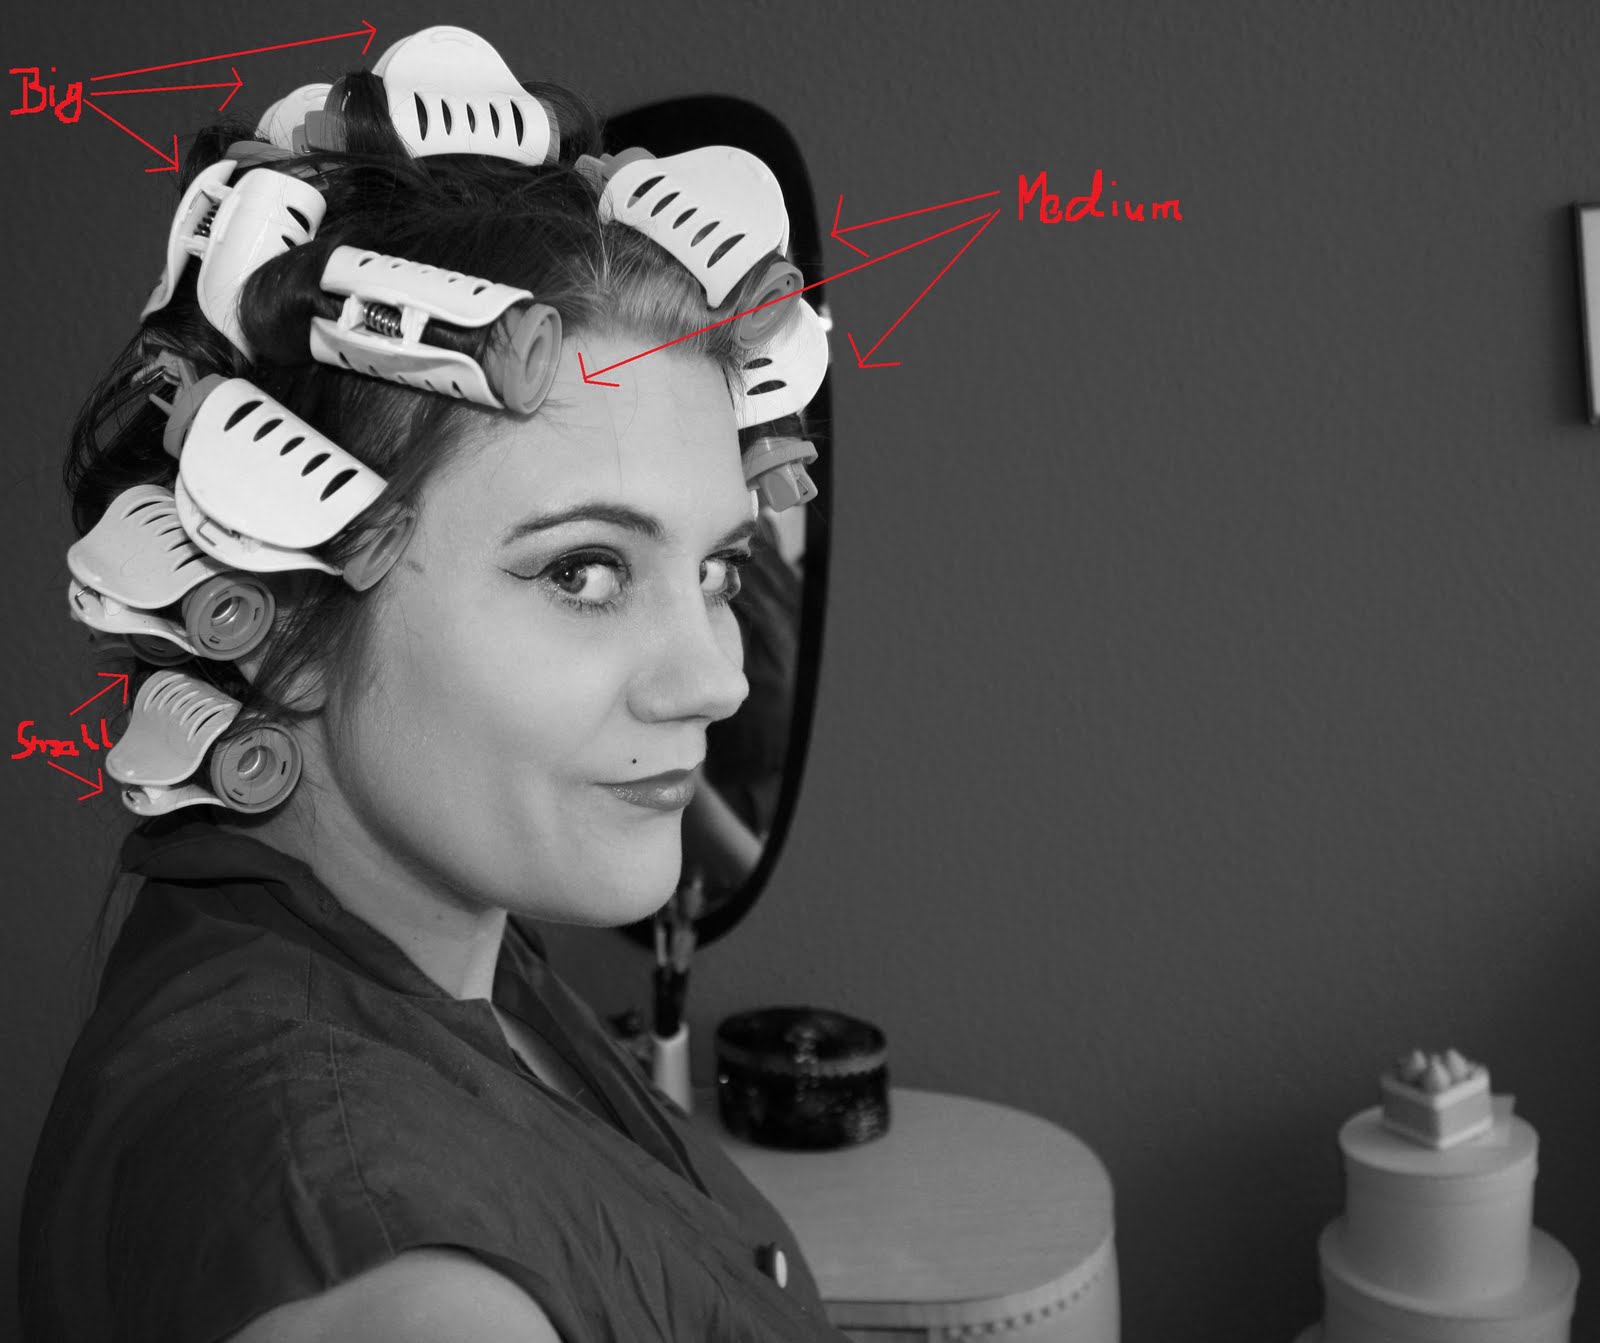
If you are a styling novice a introduction of the tools you will need is crucial for you. I remember my first attempt to get curls in my hair. I had one of those curling irons with a brush head attached. NEVER BUY ONE OF THOSE UNLESS YOU HAVE VERY FINE HAIR. My hair kept getting stuck and the $%"!%!" thing was of no use. In "Vintage hairstyling" you get a thourough instruction what sort of curling iron you can use for what, all you need to know about using heated curlers, pincurls, rollers and whatever comes in mind. "Style me Vintage" gives a rather short description with not so many pictures, so it is more aimed to those that "know their stuff" than "Vintage hairstyling". If you are not a pro about hair and need details about all the things to use, including the right pins, brushes and combs for the purpose you definately need "Vintage Hairstyling".

The instructions: "Style me Vintage" asumes that you know how to do pin curls and use curling irons and hot rollers. There are written descriptions, but most styles do not have detailed photos as to where the hair is curled forwards, backwards, etc. "Vintage Hairstyling" does this before it even get to the stylings. There are (positively!!!!) pages over pages on how to do good pincurls, how to correctly curl with an curling iron and which technique has which effect. When it comes to the instructions for the actual hairstyles it has arrows in the pictures that shows you in which direction it was curled, something that is very important to archieve the wished effect. Also is has way more detailed photos for the stylings than "Style me Vintage". Don´t get me wrong some instructions in "Style me vintage" are more detailed than others, but "Vintage hairstyling" is very very detailed throughly, so there is not so much space for any doubts.

Both books have in common that the photos are beautifull and the layouts are both very nice!!!

What is left to say is what is intended for who?

"Vintage Hairstyling" is a book for everybody: The Styling novice that has no idea where to start to the expert that still wants to learn a trick or two. It costs more but it is worth every penny. There is a wide range of styles and a lot of instruction how to archieve which effect. In any case it is a must have for your bookshelf. I´d even say: Get both editions as there are different ones in edition 1 and 2. Both books feature easy and more sophisticated styles.

"Style me Vintage" is more for those that are experts. There is no instruction on how to do pincurls, to handle a curling iron, what to use when etc. If you already know your stuff and just want a book with a few basic styles this is for you. I could imagine that stylists working for tv or movies get a good use for reference out of it. Not for absolute novices. The styles are more basic.

Mittwoch, 10. September 2008

An interesting new book!

Did you like this one?

Than I have good news for you.....


Content:
Moving forward another decade from his successful The 1940s Look Mike Brown takes an in depth look at the the 1950s - decade of the Coronation, the conquest of Everest, the Festival of Britain, the Suez Crisis, and Britain's first Wimpy Bar.
Britons turned their backs on the privations of the drab war years. The second Elizabethan age had arrived and with it came optimism for a bright future. Breezes of exciting new fashions ruffled through the wardrobes of the nation. Daring styles from overseas gusted into British homes - the Hawaiian shirt and denim jeans from the USA, and a new hair-do called the 'crew cut'.
The winds of fashion soon veered to the Continent with the rise of chique Italian and French styling. But an eclectic British style began to emerge from these influences and with it a whole new breed - the teenager. Premier Harold Macmillan famously summed up the mood of the fifties when he told the country: 'you've never had it so good'.
Read all about the new synthetic wonder fabrics, the Trapeze dress and pedal pushers, teenage heart-throbs, the Teddy Boys' quiff and DA, and drain pipe trousers.
• The 'Fifties' look - Men, Women, Children & Teenagers
• Formal and informal fashions
• Couture house to homemade
• Hairstyles and make-up
• The Figure
• Accessories - Shoes, Socks, Hats, Gloves, Spectacles, Jewellery...........
• A reference and an entertaining guide Author and broadcaster
Mike Brown is an authority on the fashions of the forties and fifties. He is the author of The 1940s Look (Sabrestorm, 2007), A Wartime Christmas, and co-author with his wife Carol of the acclaimed The Ration Book Diet. Mike lives in London.
144 pages pb, 280 x 229mm
Full colour throughout
300+ photographs & illustrations

ISBN: 978-0-9552723-3-2
Price £16.99
Published: 1st September 2008
I ordered it on amazon and expect a lot from it. I loved the 40s one! No setting patterns for hair, but fabulous descriptions and lots of pictures, clippings from vintage mags etc...  Not to mention the great tipps last time! I say don´t miss it.

Dienstag, 19. Februar 2008

PReparing for a shooting

since I´m in the middle of preparing for my shooting this weekend I thought I might as well post a how to on preparation ;-)

- check your shooting outfits! When I choose them I allways also put them on. You never know if you might lost or gained a few pounds. Both can be very unflattering. You don´t want to panic in the studio or on location because you realise your stuff doesn´t fit anymore. Also bring a wide choice of clothes - you and the photographer might get some spontanious ideas and it´s better to have a little bit more than.

- stocking check: Put on your stocking-gloves (In case you don´t have any try: http://www.ars-vivendi.de/shop/info.asp?product_group=901209&product_code=leaf_11129&search_mode=&search_group=&fct=&search_str=&sid=&retpage=/shop/catalog.asp&page=4&from= ) and check your stockings for any damages and off course if you have the matching stockings all together ;-)

- references: It doesn´t hurt to take your favourite pin up book with you as an inspiration for poses, expressions, etc. it also makes things easier to understand what your photographer wants and what you want if you can show a picture. Also if you are fortunate to have a Make up and Hair Stylist cause not everyone has practise in emulating pin up styles like that you save tons of time explaning and just can flip through it together and find out what works an what doesn´t.

- shave the day before the shooting so your skin has time to relax. Addionally I also put a big fat layer Bodybutter by Bodyshop on my legs and they´ll be cellulite-free the next day. I also apply facial masks the day before. Check your nail-polish and file your finger and toe-nails.

- if you are doing hair and make up yourself you have to try the hair-styling at least once before you use it for a shooting. It is way more likely that it works out if you know what to do. You can also get a bit after pressure when you got to hurry up with getting ready... If you do your make up for a shootingfor the first time: Don´t do it like your daily make up. You need tons and tons of colour. LEt´s say you apply blush. In your daily use you´d take a tiny tiny bit so it looks natural. For photos this would be practically invisible so you do an almost clownesque version of it. Same goes for eye-shadow. The lightning "swallows" a lot of the colour. If you feel like a dragqueen and wouldn´t dare to go out like that the make up is just right.

-even if you know that there´s a make up artist bring some basic stuff for the case of cases so you can do your own styling if needed.

- exchange phone-numbers with the photographer so you can reach him if something unforeseen happens. My trains are regulary late. Mostly just a few minutes, but if it´s for a longer time I let my photographer know that he doesn´t need to hurry with picking me up or can drink a cup of coffee while waiting. Or if you go by car and get caught in a traffic yam. Better let him know. Be a responsible person cause they might worry if you come after all or if something bad happened to you. I mostly send them a SMS when I´m on my way.

If you follow that advice I´m quiet sure there won´t be any unpleasant surprises for you when shooting.

Samstag, 1. Dezember 2007

Some cute scans

Hi everyone!

Today I stumbled over a charming little booklet that I bought some time ago and decided to share some scans of it:

The colours that flatter your haircolour the best!


How a dress is made!


The things a woman is supposed to bring into a marriage!


Besides all this my weekend is very lazy :-) But we go to one of the many X-MAs markets tommorow and we´ll see...

Have a wonderfull weekend!
Sari

Donnerstag, 1. November 2007

A little video on hairsetting

Hi everyone!

I posted a little video on how I set my hair with rollers for those photos on youtube and thought I might as well share it here, too:
 

If you wanna see more views of the hair-do you can just check out the "Pin up Shooting Making of" on my youtube channel :-) I hope you´ll enjoy it and might even get some use out of it. I plan to do more how tos, but as I just started a new I don´t have that much energy right now...

Anyway the next day I was basically just brushing the hair out and adjusted the rolls on my head with pins. I was going for a sort of  "casual look" that goes with most outfits I planned to use and wouldn´t be too "strict" for a mainstream-audience.

Dienstag, 24. April 2007

The Pin up Starter Kit

Hi ladies!

Here is one more guide for ladies that want to get started with pin up or dressing vintage...

Make up and styling:
RED Lipstick (not light pink or pink or nude-tones or whatever it just wouldn´t look right. There is a red to match every skincolour. If you´re in doubt order some samples from http://www.besamecosmetics.com/)

the usual make up stuff

Two words about Make up books: KEVYN AUCOIN. he has two volumes of books that show the basics of Make up AND also shows some cute retro-styles. Check them out on amazon!

For the hair: Find out what´s best for you to get your hairs curly (no straight hairs, unless you wanna go for a 60s look). some things to try: Tripple Barrel Iron (for georgous fake-waterwaves - it even works quiet easy. Even when I tried it for the first time I managed to give my hair a georgous look with it. Take a heat protection spray and there you go), Curling iron (heat protection needed still), Curlers that one can heat up, Sponge Rollers (I sleep in them somtimes to get curly hairs, but beware the hair needs looong to dry), Hot sticks and last but not least Pincurls (I personally never found out how they work, but maybe they are your thing. You´ll need a setting-lotion for those)

Tons of hair-pins

Clothing:
Girdle or waist cincher (You can find them either on ebay, but you can find them at www.girdlebound.com (USA), www.ars-vivendi.de (Germany) and www.whatkatiedid.com (UK)) no Pin up is complete without them and they are to hold the:

Full Fashioned or seamed Stockings (without seam only if you wanna go 60s, believe me, it does make a difference)

Gloves to put on the stockings (you don´t want to get them ruined, right?)

Bullet Bra (a normal bra might do for the beginning, but if you wanna do it 100% right you´ll sooner or later want to get a proper bullet one for the right vintage shape. Sources besides ebay: www.girdlebound.com (USA), www.cameo-intimates.com (USA), www.ars-vivendi.de (Germany) and www.whatkatiedid.com (UK))

Vintagey Heels

The rest of clothing depends on which decade you personally prefer. Those are just basics cause I get to see many photos of girls that try to look pin up style in their photos, but it just doesn´t look right cause there is just one or two wrong details that kill the illusion.

Hugs,
Sari